How to Host HTML5 Videos on AWS
If you can, you should upload your videos to YouTube (unlisted) and then embed them in your website. It’s free and easy.
But maybe YouTube won’t work for you. For example, I could not use YouTube alone for my family’s educational website, Rocket Spelling, because some schools block YouTube for students.
In that case, hosting videos yourself using AWS is a perfectly valid alternative.
Disclaimer: I am not an AWS expert! But this strategy worked for me.
I learned from this tutorial on cloudonaut.
The Plan
To enable streaming the video with adaptive bitrate (where the quality changes depending on the strength of your internet connection), we have to get a bit fancy. Here’s the process:
- Step 1: Upload the plain video file to an S3 bucket
- Step 2: Use AWS MediaConvert to split the video into many sections and multiple different quality levels in HLS and Dash formats. The new files will be saved back into the S3 bucket.
- Step 3: Serve the S3 bucket files on the internet using Amazon CloudFront, which caches the files to help them load more quickly.
- Step 4: Use video.js to load and view the video on a web page. (The plain
<video>element can’t handle the adaptive bitrate and other fancy features we generated in step 2.)
Step 1: Upload the video to S3
If you do not have an Amazon S3 bucket already, create one. Then create a new empty folder and upload your video inside.
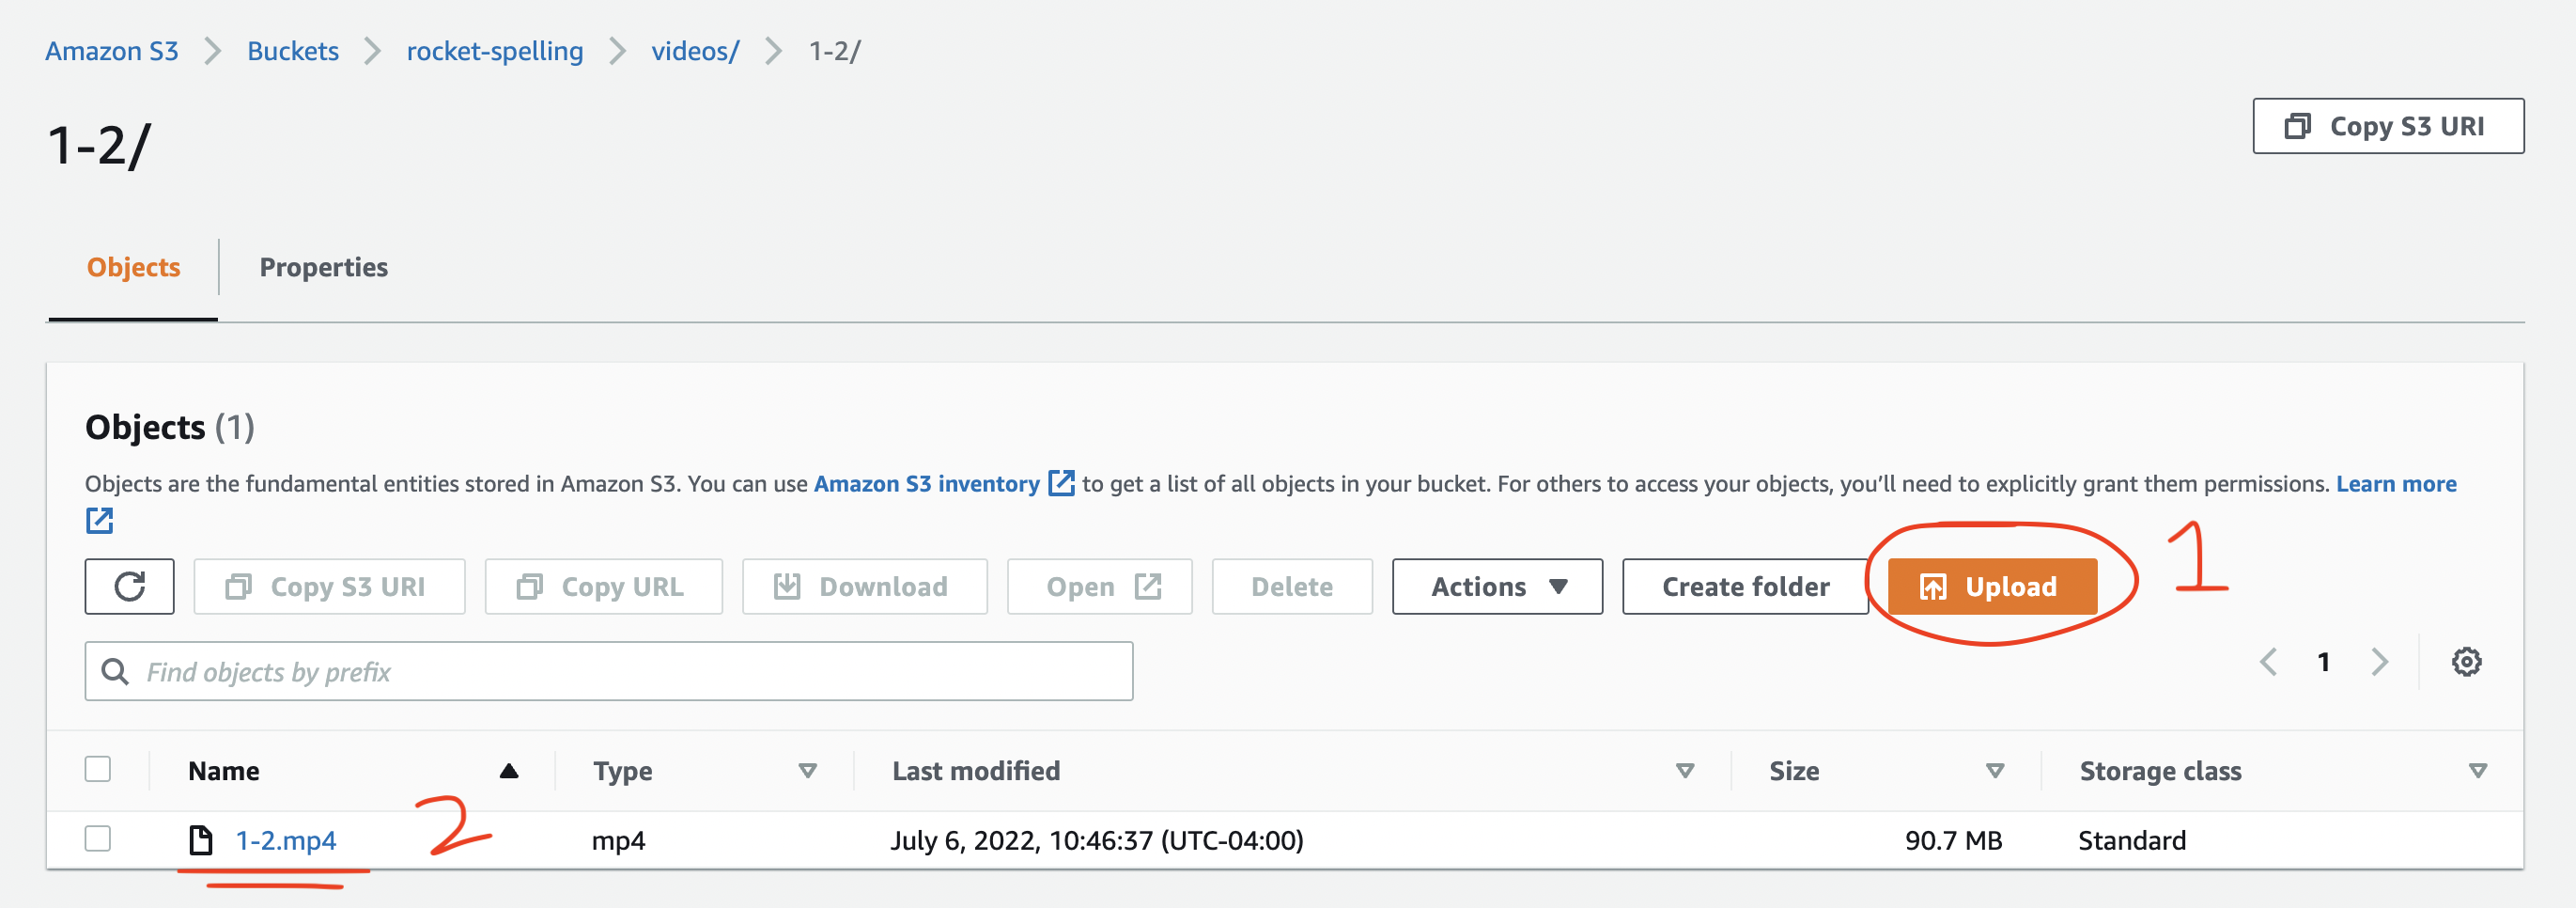
In step 2, you will see why it’s important for the video to live inside its own otherwise-empty folder.
Step 2: Use AWS MediaConvert to generate HLS and Dash files
The HLS and Dash formats make it possible to stream video with adaptive bitrate, where the quality changes depending on the strength of your internet connection.
AWS MediaConvert is a tool that will generate HLS and Dash versions of our video file automatically.
Generate HLS Files
In MediaConvert, under “Job templates”, select “System Templates > OTT-HLS” (see screenshot).
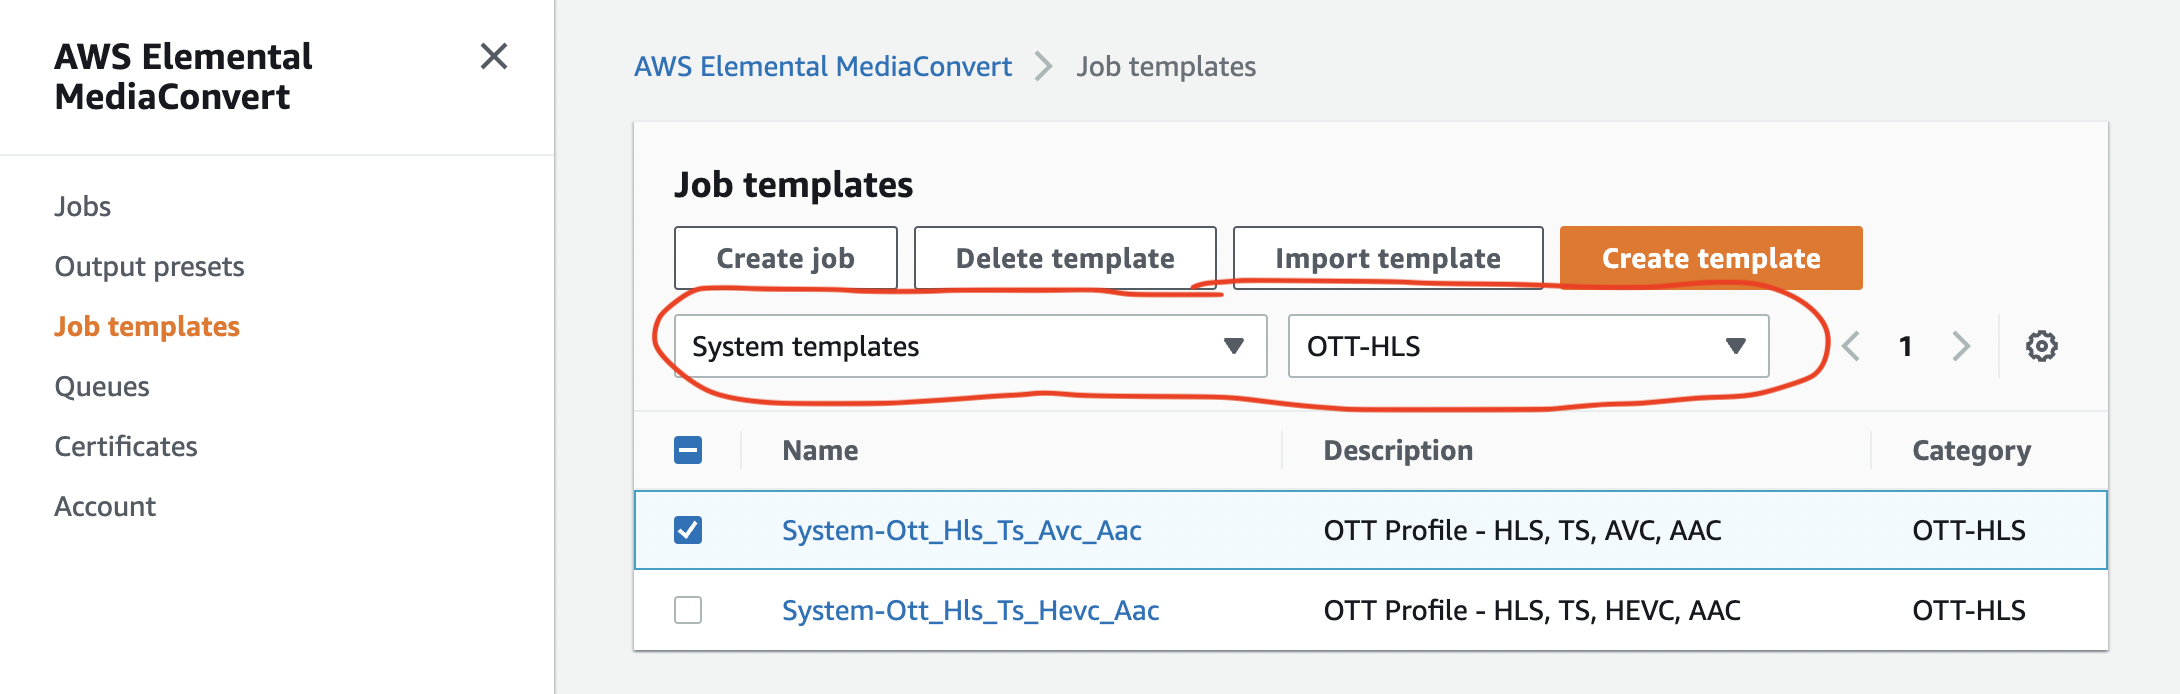
Then choose the System-Ott_Hls_Ts_Avc_Aac template and click the “Create job” button.
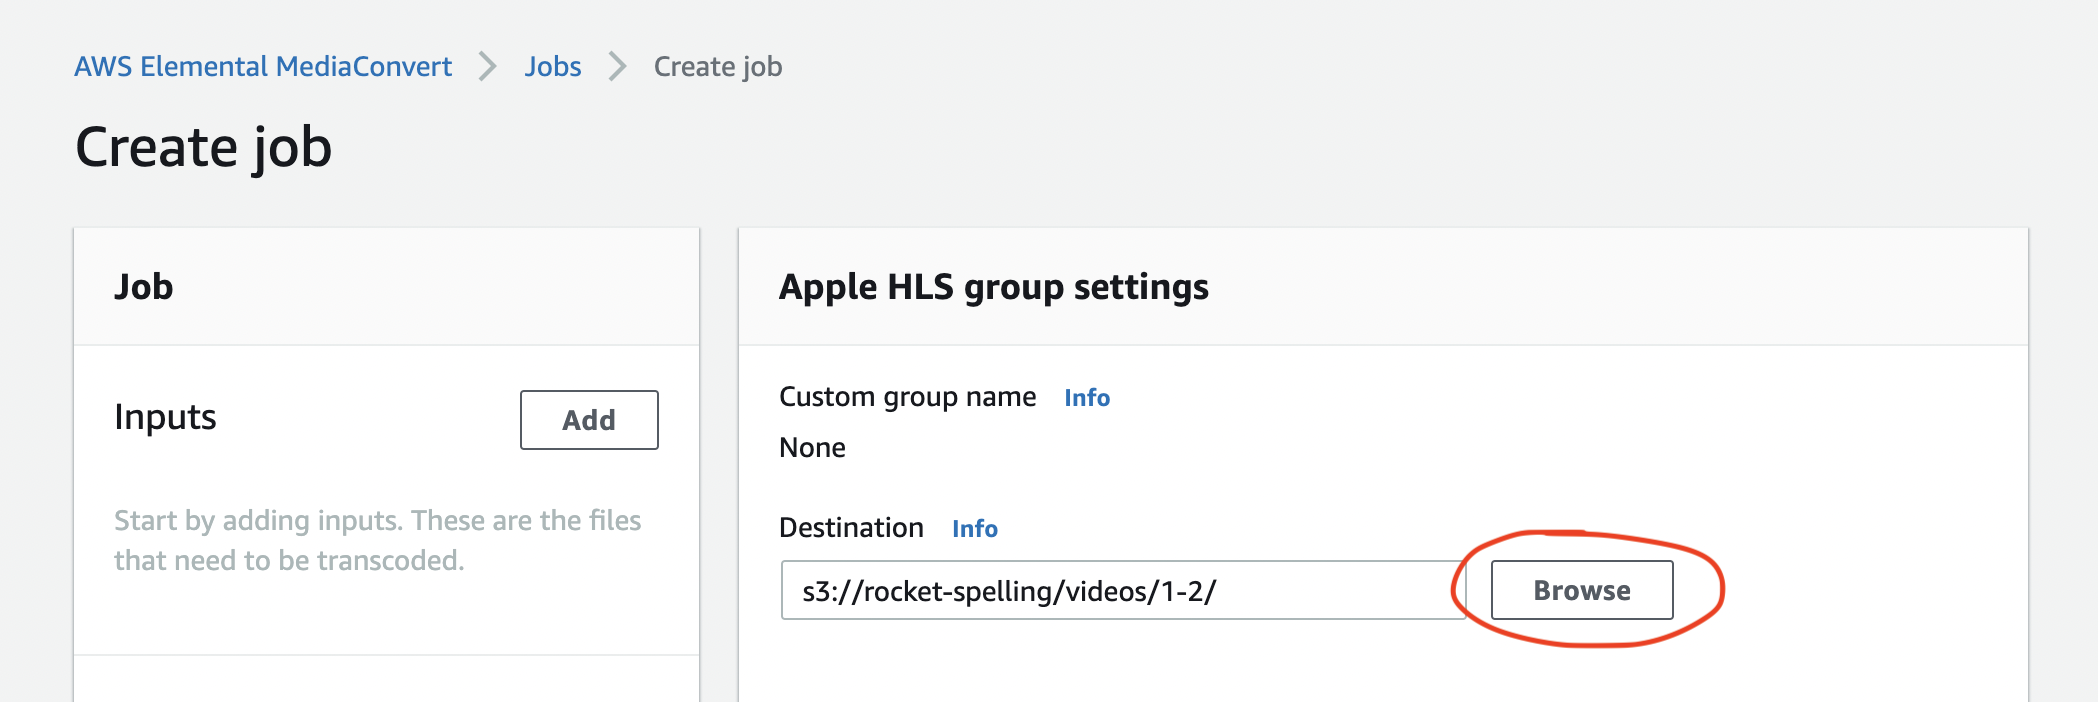
For the HLS destination, click “Browse” and choose the S3 bucket & folder where your video file lives. (MediaConvert is going to generate lots more files and put them in that same folder.)
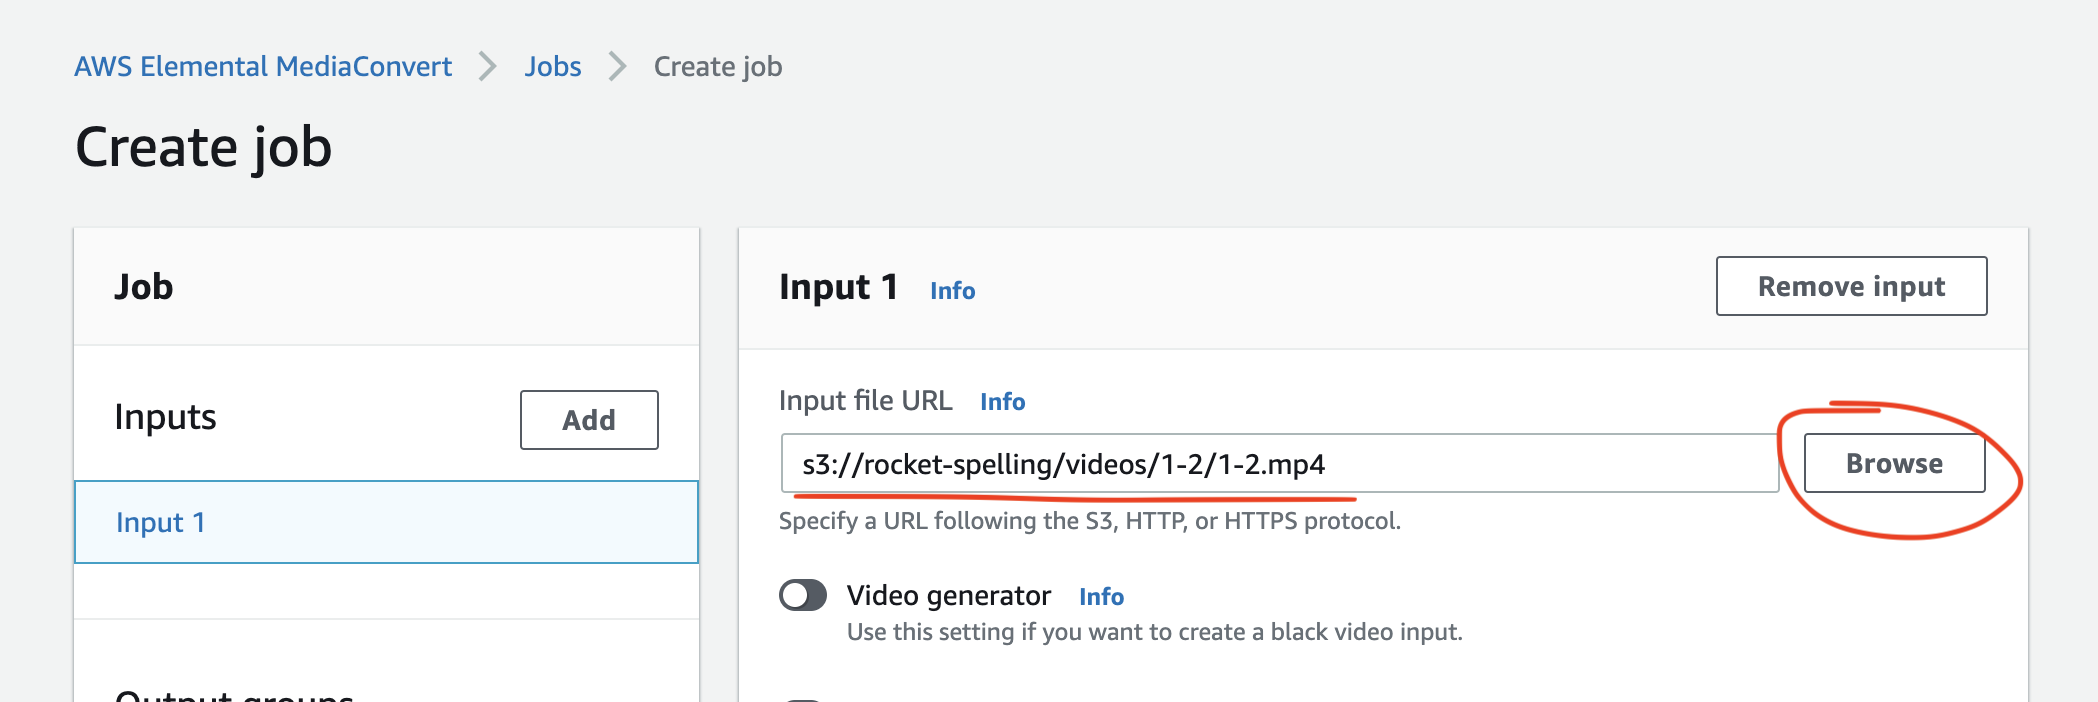
Next, add an input using the “Add” button on the left. Then choose the source file to be the original video file in S3.
Finally, scroll down to the bottom and click “Create”. This will create a job to generate HLS files for your video. The job will take a few minutes to run, and you can check its progress as it goes.
Generate Dash Files
You should follow the exact same process a second time to generate the Dash files. The only difference is that you should use the System-Ott_Dash_Mp4_Avc_Aac template under “System Templates > OTT-DASH”.

Make the files publicly accessible
After the MediaConvert jobs are complete, return to your S3 bucket. You will see that the folder you created is now full of hundreds of files. Each file represents a piece of your video in either HLS or Dash, at some resolution.
Before we can make these files accessible from the internet, we need to make them publicly readable. (If you don’t, you’ll get a 403 error later.) To do this, select all the generated files (everything in the folder) and then choose “Actions > Make public using ACL”.
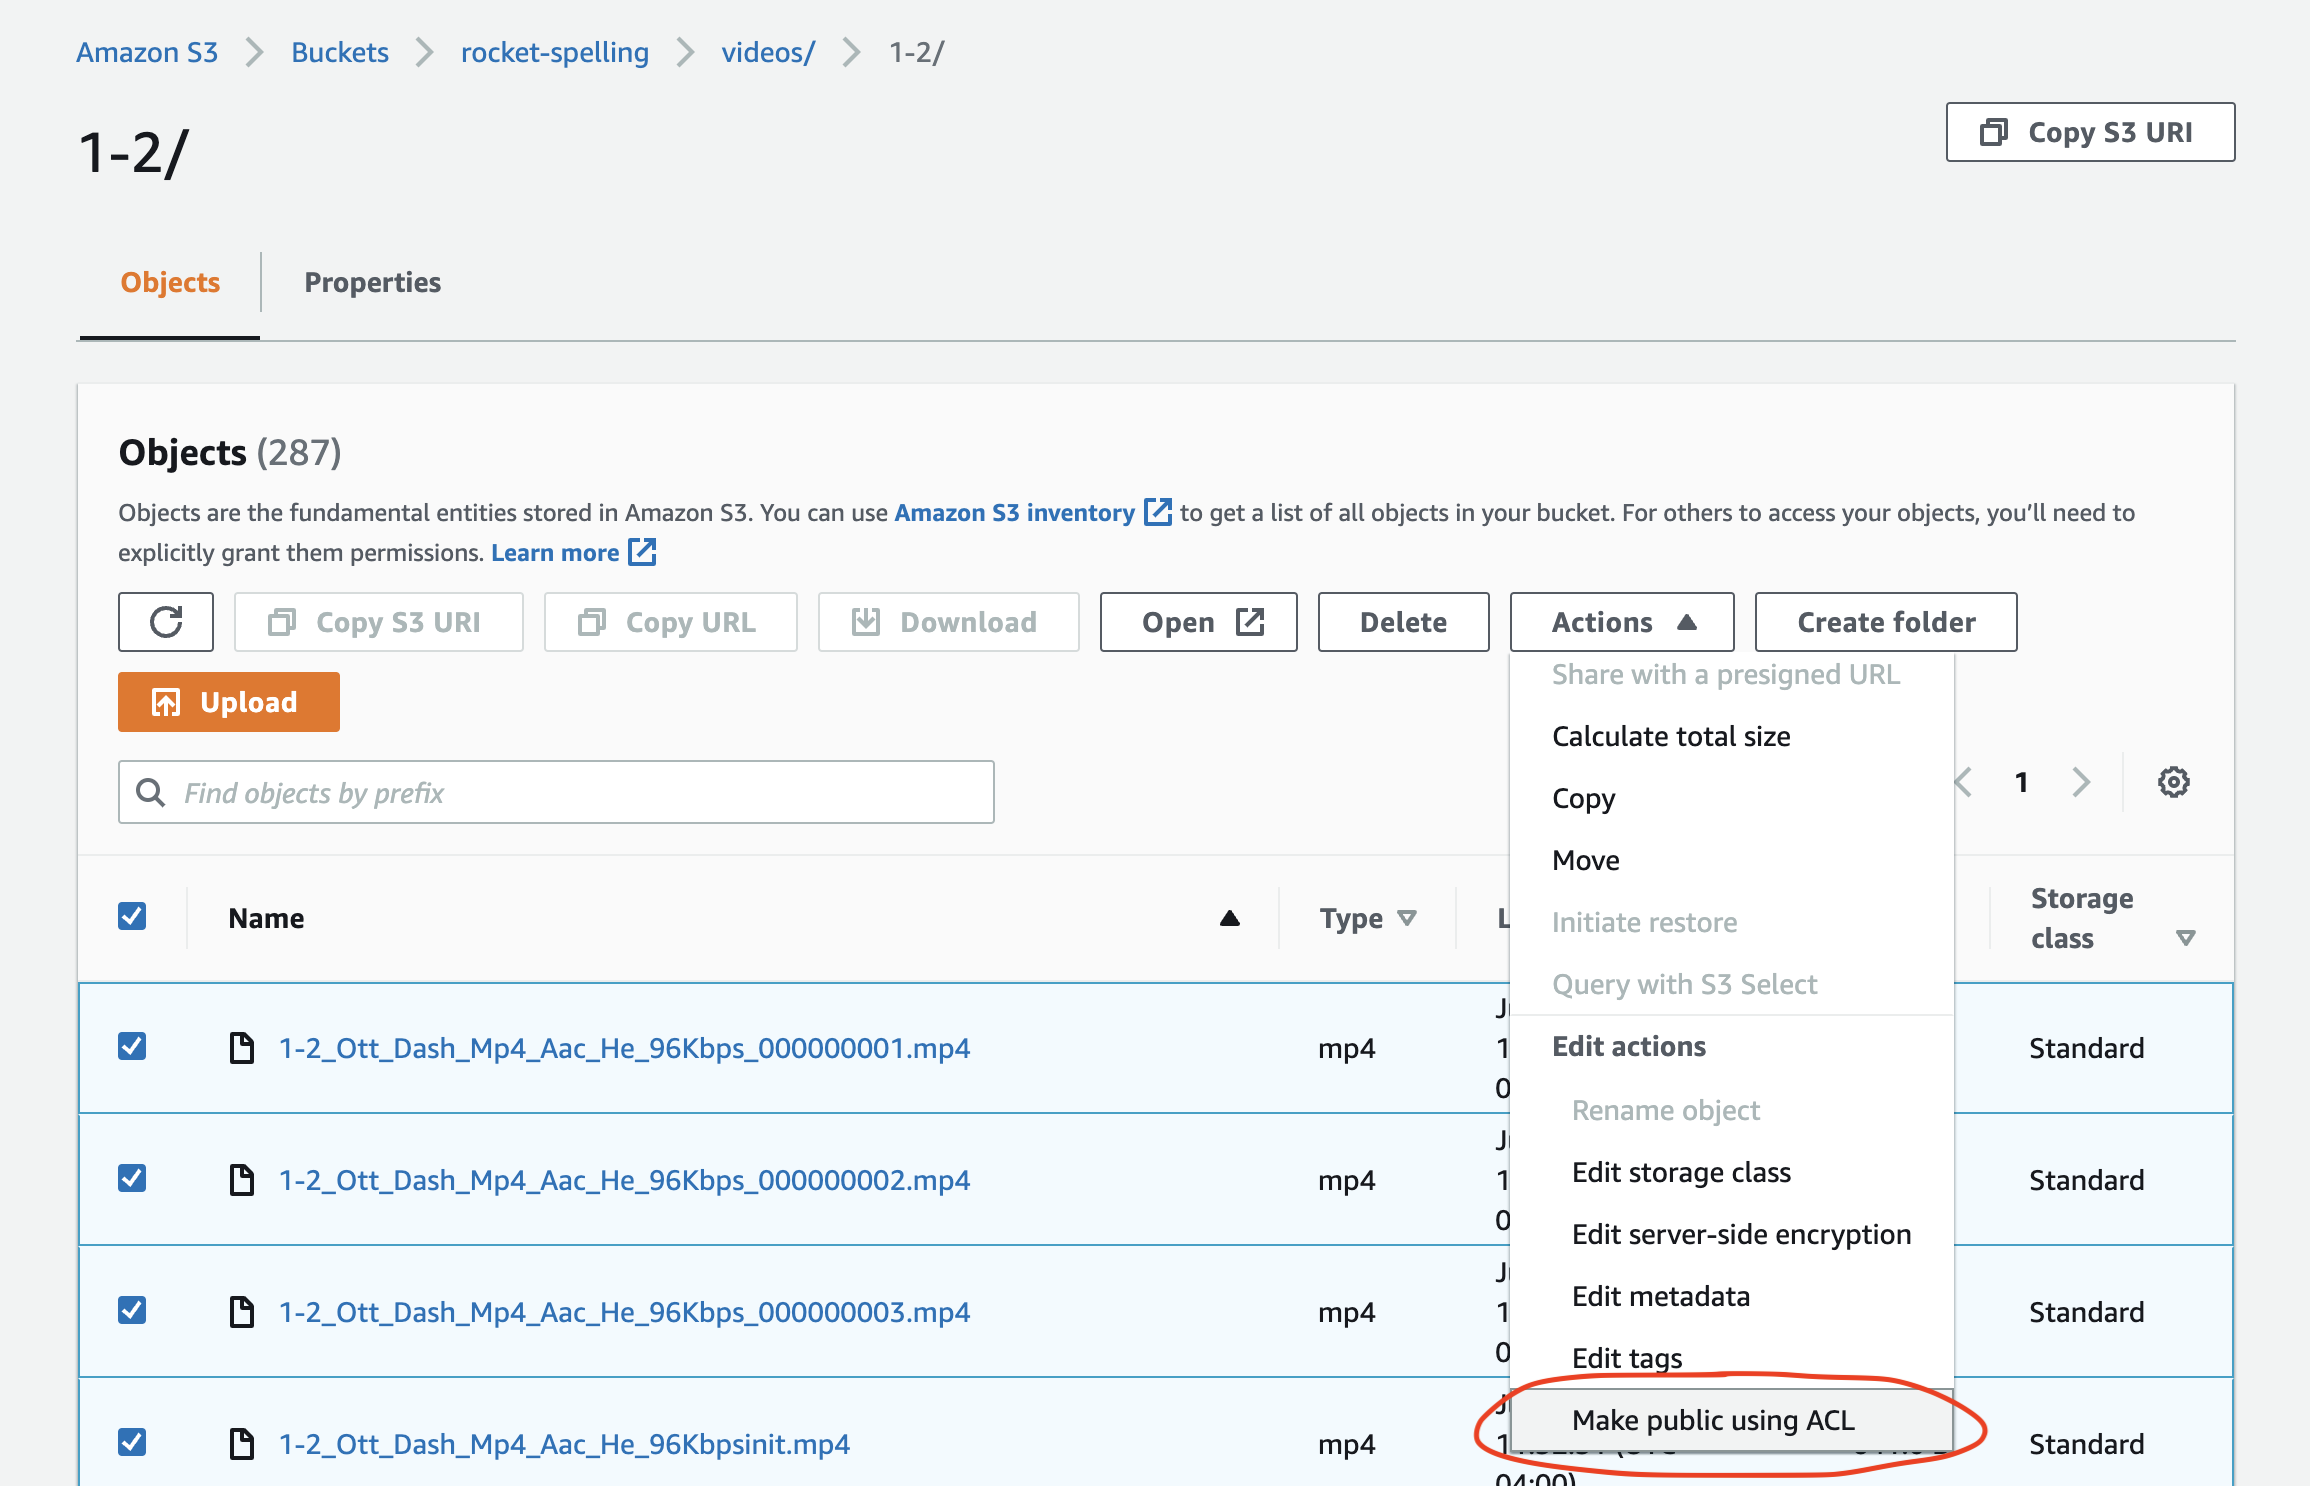
(You might have to scroll down in the Actions dropdown.)
Step 3: Serve the files with Amazon CloudFront
It’s possible to load files directly from S3, but to make video hosting cheaper and faster, it’s more efficient to use CloudFront.
Create a new CloudFront “Distribution” and choose the following settings:
- Set the Origin Domain to be your S3 bucket. Your CloudFront Distribution is going to make your bucket files publicly accessible to the internet (with caching to make it fast).
- At the bottom of “Default cache behavior”, set Response headers policy to “CORS-With-Preflight”. This allows the files to be accessed from other websites on the internet (such as the website where you plan to embed your video.)
- You can leave all the other settings as their default values.
Your new distribution will have a domain name:
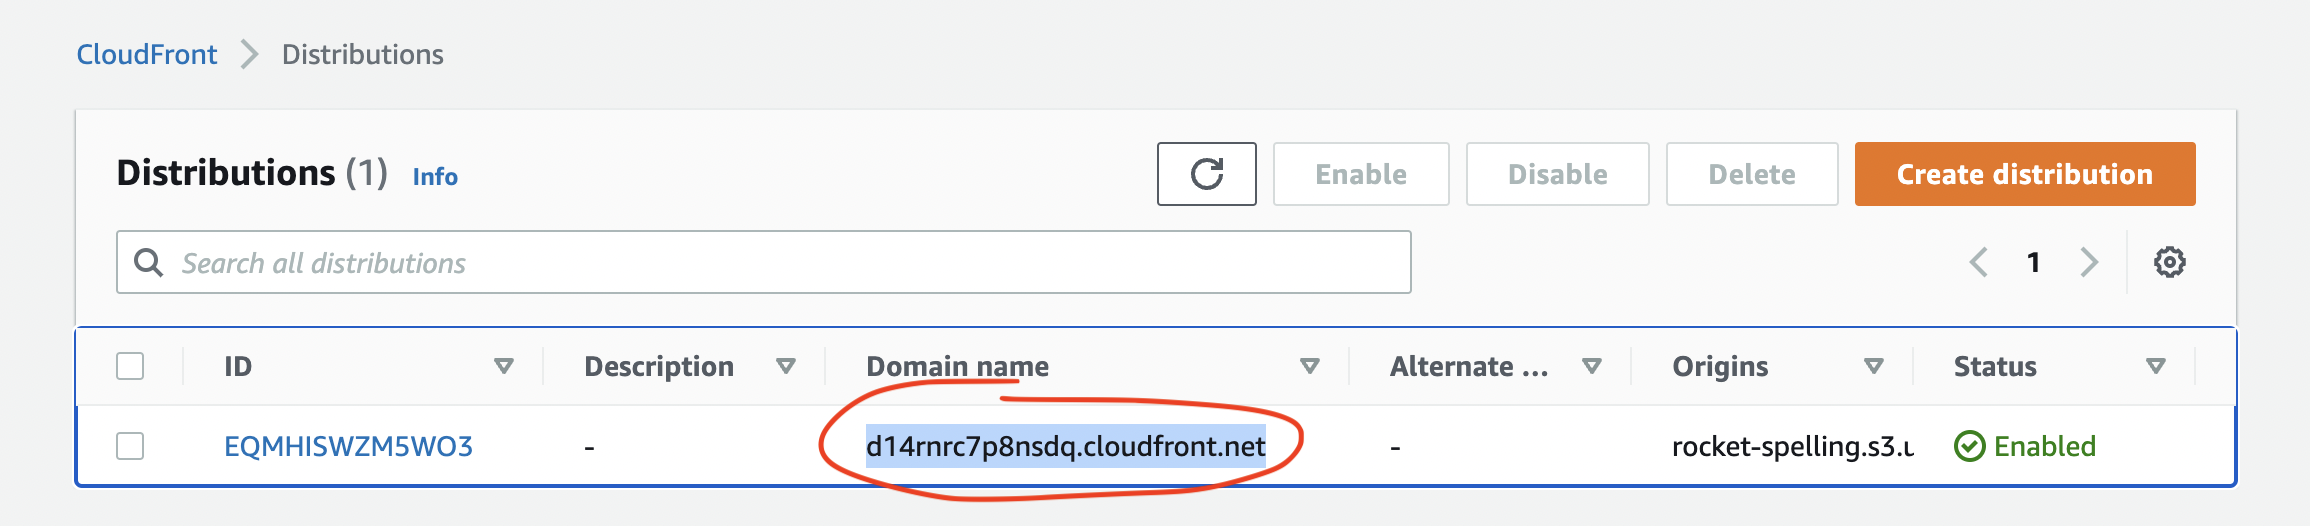
This name is very important because it’s where you’ll go to access the video files.
Step 4: Play the video with video.js
Finally, we have all the files we need on AWS. Now we can get to actually playing them using video.js.
First, create an HTML video element on your page:
<video controls preload="auto" class="video-js">
  <source
    src="https://YOUR_DOMAIN.cloudfront.net/YOUR_FOLDER_PATH/VIDEO_NAME.m3u8"
    type="application/x-mpegURL"
  />
  <source
    src="https://YOUR_DOMAIN.cloudfront.net/YOUR_FOLDER_PATH/VIDEO_NAME.mpd"
    type="application/dash+xml"
  />
</video>
You’ll need to replace YOUR_DOMAIN, YOUR_FOLDER_PATH, and VIDEO_NAME with your own data:
YOUR_DOMAINcomes from your CloudFront distribution. Mine isd14rnrc7p8nsdq.cloudfront.net.YOUR_FOLDER_PATHandVIDEO_NAMEdepend on where you saved the video files in the S3 bucket. I saved my video files in/videos/1-2/. My original file was called1-2.mp4, so the two generated files I needed to access were/videos/1-2/1-2.m3u8and/videos/1-2/1-2.mpd.
Next, add the code for video.js:
<html>
  <head>
    <!-- Load the video.js stylesheet -->
    <link href="https://vjs.zencdn.net/7.19.2/video-js.css" rel="stylesheet" />
  </head>
  <body>
    <!-- Somewhere in the body, include the video -->
    <video controls preload="auto" class="video-js">
      <source
        src="https://YOUR_DOMAIN.cloudfront.net/YOUR_FOLDER_PATH/VIDEO_NAME.m3u8"
        type="application/x-mpegURL"
      />
      <source
        src="https://YOUR_DOMAIN.cloudfront.net/YOUR_FOLDER_PATH/VIDEO_NAME.mpd"
        type="application/dash+xml"
      />
    </video>

    <!-- Load the video.js script -->
    <script src="https://vjs.zencdn.net/7.19.2/video.min.js"></script>

    <!-- Run video.js to upgrade our <video> element -->
    <script>
      document.querySelectorAll(".video-js").forEach(function (element) {
        var player = videojs(element, {
          controls: true,
          autoplay: false,
          preload: "auto",
          html5: {
            vhs: {
              limitRenditionByPlayerDimensions: false,
              overrideNative: false,
            },
          },
        });
      });
    </script>
  </body>
</html>
And that’s it! You should have a working embedded video.